Here at From Another, we love vintage hats. Some of the styles, shapes, and designs on vintage snapbacks have never been replicated, so you can find something really unique that matches your style. Not to mention the gratification that comes with wearing a hat that’s over 20 years old! Sometimes vintage hats come pre-worn, and oftentimes the previous owner really loved, and unfortunately really sweat in the hat. Luckily for you, we’ve put together this guide to help you clean vintage hats, and restore them to their former glory.
Step 1: Gather your materials
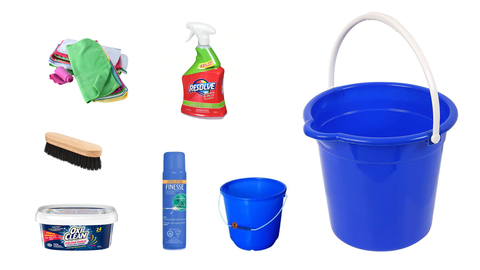
The first step will be acquiring everything you need in order to clean the hat. With our method you will need the following materials:
- Bucket full of warm water
- Stain remover spray
- Unscented hairspray
- Clean rags
- Oxy-clean (We recommend the non color bleed version)
- Stiff brush
- A dome shaped object like a bowl or smaller bucket
Step 2: Start the soak
The next step will be beginning to soak your hat in the oxiclean mixture. Mix together warm water and the recommended amount of oxiclean in your bucket. Spray your hat with the stain remover spray on the sweatband of the hat, and anywhere else there are bad stains. Then you can submerge the hat in the bucket, and let it soak for 2 or more hours
Step 3: Scrub the stain
As the hat soaks, we recommend that you periodically remove the hat, and use your brush to scrub at any stains. This allows the stain remover and oxyclean to really get in to those bad areas, and ideally remove the stains.
Step 4: Remove and Rinse
After the 2+ hours of soaking, remove the hat from the oxiclean mixture, and rinse it out with some warm water. It’s important you rinse out all the oxiclean mixture, otherwise the hat will dry with a film of oxyclean on it.
Step 5: Shape the Hat
Once rinsed, pat the hat excessively with your rag to remove all the extra water in the material of the hat. Then spray the hat with the unscented hair spray to help set the shape of the hat. Finally, and this is VERY important, set the hat on your bowl or hat shaped bucket, and make sure that the hat is in the exact shape that you want it to be, so it can dry and set in that shape. Let the hat dry completely before moving to the next step.
Step 6:
Enjoy your hat! We love vintage hats, and the uniqueness and rarity that goes along with wearing them. The nice thing about pre-worn hats is that once you have worn it, you can clean it up, and maybe even sell them it more once you've worn it. Or if you like to resell - hats in need of a cleaning are a great way to put some elbow grease in to make some money.